
들어가기 전에
기존에는 원본 이미지를 S3에 바로 업로드하고, 프론트엔드에서 해당 원본 이미지를 사용하도록 하였습니다. 이렇게 진행하다보니, 사실상 모바일 디바이스에서 보여지는 사진 대비 너무 큰 이미지를 호출하게 되었습니다. 이에, 기존 SpringBoot를 이용한 S3에 이미지 업로드 하는 코드를 수정하여 이미지를 리사이징(768px * 768px로 크기를 조절)하여 올리고자 합니다.
사실 SpringBoot에서 직접 이미지를 리사이징하려면, MultipartFile로 받은 파일들에 대해 BufferedImage 형태로 변경하여 진행이 필요합니다. 이 경우 IO가 발생하는터라 리소스를 좀 더 사용할 것이라는 판단은 들었지만, AWS CloudFront와 Lambda@Edge를 통해 resizing을 할 경우 Lambda 함수 배포 등의 관리 포인트 역시 늘어나게 되어 현 버전에서는 SpringBoot에 이미지 리사이징을 구현하게 되었습니다.
기존 이미지 업로드 소스를 조금 수정하여 구현하였기 때문에, SpringBoot를 통한 AWS S3에 이미지 업로드 구현이 아예 되어 있지 않다면 하기 포스팅을 먼저 참고하시길 바랍니다.
SpringBoot를 이용한 AWS S3에 resizing 이미지 업로드하기
JAVA를 이용한 이미지 리사이징은 하기 라이브러리를 사용하여 가능합니다.
java.awt.Graphics2DImage.getScaledInstance()ImgscalrThumbnailatorMarvin
위 라이브러리들 중, 기본 JAVA 라이브러리를 통해 가능한 것은 java.awt.Graphics2D였지만 결과물이 생각보다 많이 깨져 사용하지 않았습니다. 그 외 다른 라이브러리들 중 Marvin이 제일 결과물 대비 시간이 오래 걸리지 않는다고 판단하여 Marvin을 통해 구현하였습니다.
Marvin 샘플 코드
BufferedImage resizeImage(BufferedImage originalImage, int targetWidth, int targetHeight) {
    MarvinImage image = new MarvinImage(originalImage);
    Scale scale = new Scale();
    scale.load();
    scale.setAttribute("newWidth", targetWidth);
    scale.setAttribute("newHeight", targetHeight);
    scale.process(image.clone(), image, null, null, false);
    return image.getBufferedImageNoAlpha();
}build.gradle
resizing 시 필요한 의존성을 먼저 build.gradle에 추가하도록 하겠습니다.
    implementation 'com.github.downgoon:marvin:1.5.5'
    implementation 'com.github.downgoon:MarvinPlugins:1.5.5'
compile group: 'org.springframework', name: 'spring-test'- 이미지 리사이징의 경우,
Marvin 라이브러리를 사용하여 구현할 것이기 때문에 위와 같이Marvin,MarvinPlugins의존성을 추가해주었습니다. - 기존에
MultipartFile로 이미지 파일을 받고 있어, 이미지 파일을BufferedImage로 변환하고 변환된BufferedImage를MultipartFile로 다시 변환할 때에MockMultipartFile을 사용하기 위해spring-test를 의존성에 추가해주었습니다.
AwsS3Service.java
앞서 말씀드렸듯 이번 포스팅에서는 기존에 구현한 이미지 업로드 소스를 기반으로 진행되어 해당 소스에서 추가 필요한 부분에 대해서만 작성하였습니다.
@Service
@RequiredArgsConstructor
public class AwsS3Service {

    @Value("${cloud.aws.s3.bucket}")
    private String bucket;

    private final AmazonS3 amazonS3;

    public List<String> uploadImage(List<MultipartFile> multipartFile) {
        List<String> fileNameList = new ArrayList<>();

        multipartFile.forEach(file -> {
            // content-type이 image/*가 아닐 경우 해당 루프 진행하지 않음
            if(Objects.requireNonNull(file.getContentType()).contains("image")) {
                String fileName = createFileName(file.getOriginalFilename());
                String fileFormatName = file.getContentType().substring(file.getContentType().lastIndexOf("/") + 1);

                MultipartFile resizedFile = resizeImage(fileName, fileFormatName, file, 768);

                ObjectMetadata objectMetadata = new ObjectMetadata();
                objectMetadata.setContentLength(resizedFile.getSize());
                objectMetadata.setContentType(file.getContentType());

                try(InputStream inputStream = resizedFile.getInputStream()) {
                    amazonS3.putObject(new PutObjectRequest(bucket, fileName, inputStream, objectMetadata)
                            .withCannedAcl(CannedAccessControlList.PublicRead));
                } catch(IOException e) {
                    throw new ResponseStatusException(HttpStatus.INTERNAL_SERVER_ERROR, "이미지 업로드에 실패했습니다.");
                }

                fileNameList.add(fileName);
            }
        });

        return fileNameList;
    }

    private String createFileName(String fileName) {
        return UUID.randomUUID().toString().concat(getFileExtension(fileName));
    }

    private String getFileExtension(String fileName) {
        try {
            return fileName.substring(fileName.lastIndexOf("."));
        } catch (StringIndexOutOfBoundsException e) {
            throw new ResponseStatusException(HttpStatus.BAD_REQUEST, "잘못된 형식의 파일(" + fileName + ") 입니다.");
        }
    }

    MultipartFile resizeImage(String fileName, String fileFormatName, MultipartFile originalImage, int targetWidth) {
        try {
            // MultipartFile -> BufferedImage Convert
            BufferedImage image = ImageIO.read(originalImage.getInputStream());
            // newWidth : newHeight = originWidth : originHeight
            int originWidth = image.getWidth();
            int originHeight = image.getHeight();

            // origin 이미지가 resizing될 사이즈보다 작을 경우 resizing 작업 안 함
            if(originWidth < targetWidth)
                return originalImage;

            MarvinImage imageMarvin = new MarvinImage(image);

            Scale scale = new Scale();
            scale.load();
            scale.setAttribute("newWidth", targetWidth);
            scale.setAttribute("newHeight", targetWidth * originHeight / originWidth);
            scale.process(imageMarvin.clone(), imageMarvin, null, null, false);

            BufferedImage imageNoAlpha = imageMarvin.getBufferedImageNoAlpha();
            ByteArrayOutputStream baos = new ByteArrayOutputStream();
            ImageIO.write(imageNoAlpha, fileFormatName, baos);
            baos.flush();

            return new MockMultipartFile(fileName, baos.toByteArray());

        } catch (IOException e) {
            throw new ResponseStatusException(HttpStatus.INTERNAL_SERVER_ERROR, "파일 리사이즈에 실패했습니다.");
        }
    }
}MarvinImage객체의 경우,BufferedImage를 통해 생성이 되기 때문에 먼저MultipartFile을BufferedImage로 변경하는 작업을 진행했습니다.- 최대한 resizing하면서
width와height간의 비율을 유지하고자,originWidth,originHeight을 체크하여 비율 계산을 하여newHeight값을 선정했습니다. - Scale 객체에 의해 기존 이미지(imageMarvin) 파일의
width,height를 변경하여BufferdImage로 변환하였습니다. - 새로 생성된
BufferedImage를MultipartFile로 변환하여resizeImage메소드를 반환함에 따라 기존 이미지 업로드 코드를 그대로 사용할 수 있었습니다.BufferedImage를MultipartFile로 변환할 때에는 MultipartFile interface 구현체를 따로 만들어서 진행할 수도 있지만, 오로지MultipartFile로 변환할 때에만 쓰기 위함이라MockMultipartFile을 이용하여 변환하였습니다.
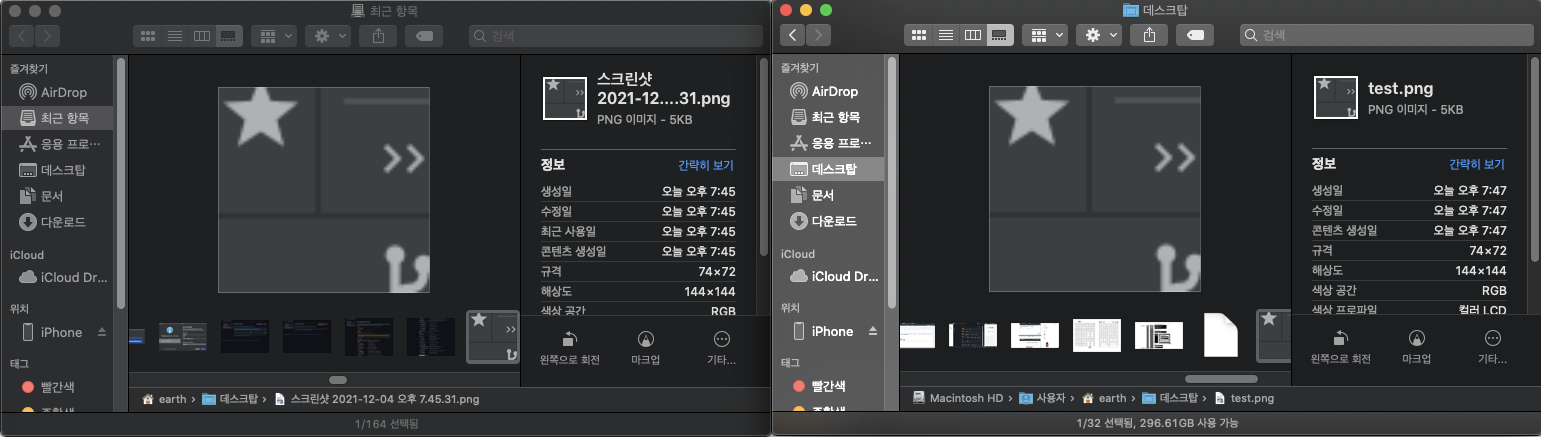
결과 예시
원본 사진의 width가 768보다 작아 resizing하지 않고 S3에 올라간 경우
원본 사진의 width가 768보다 커서 resizing하여 S3에 올라간 경우
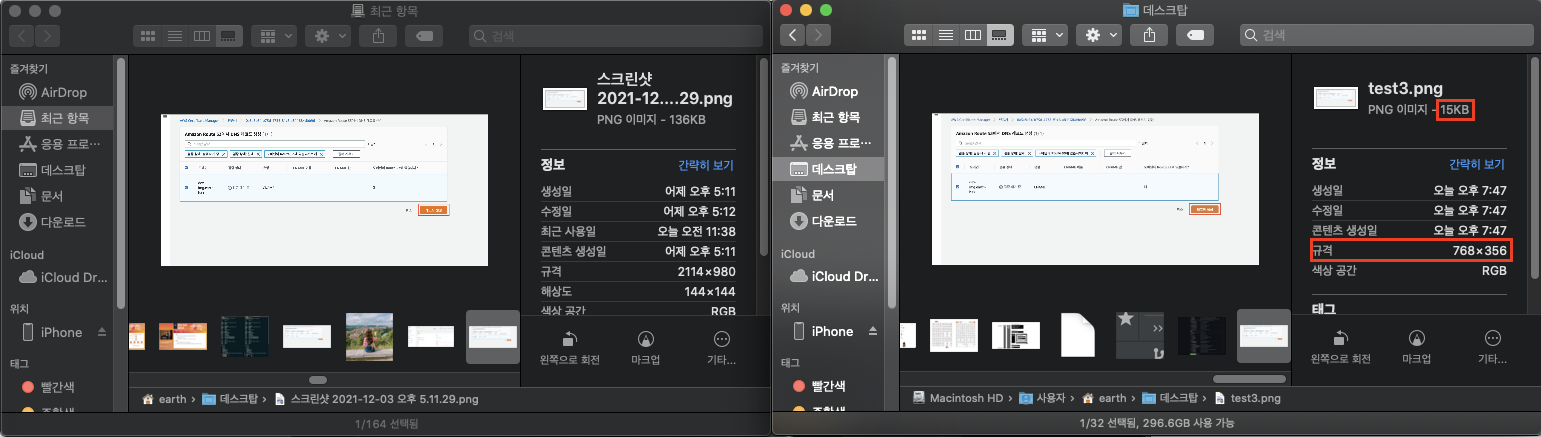
- 이미지 용량도 줄어들고, 규격 역시 줄어들었음을 확인할 수 있습니다.
참고 자료
'FRAMEWORK > Spring' 카테고리의 다른 글
| [SpringBoot] SpringBoot를 이용한 email 전송하기(첨부파일 포함) (0) | 2021.12.20 |
|---|---|
| [SpringBoot 2.5↑] 빌드 시 2가지 jar가 생성되는 현상 (executable jar & plain jar) (4) | 2021.12.13 |
| [SpringBoot] SpringBoot를 이용한 AWS S3에 여러 파일 업로드 및 삭제 구현하기 (2) | 2021.10.29 |
| [Querydsl, pageable] slice를 이용한 무한 스크롤 (0) | 2021.10.29 |
| [Enum] enum에 연결된 값을 통해 enum값 알아내기 (0) | 2021.10.26 |